1) Project requirements
- PHP 8.2 or newer.
- Composer 2.x.
- Node.js 20+ and npm.
- MySQL/MariaDB or SQLite for local/dev environments.
- Common Laravel PHP extensions: Ctype, fileinfo, JSON, Mbstring, OpenSSL, PDO, Tokenizer, XML.
2) Project installation
A) Web installer — /install (recommended)
The easiest way to install. Upload the files to your server, create the database in your hosting panel, then open the following URL in your browser:
https://your-domain.com/install
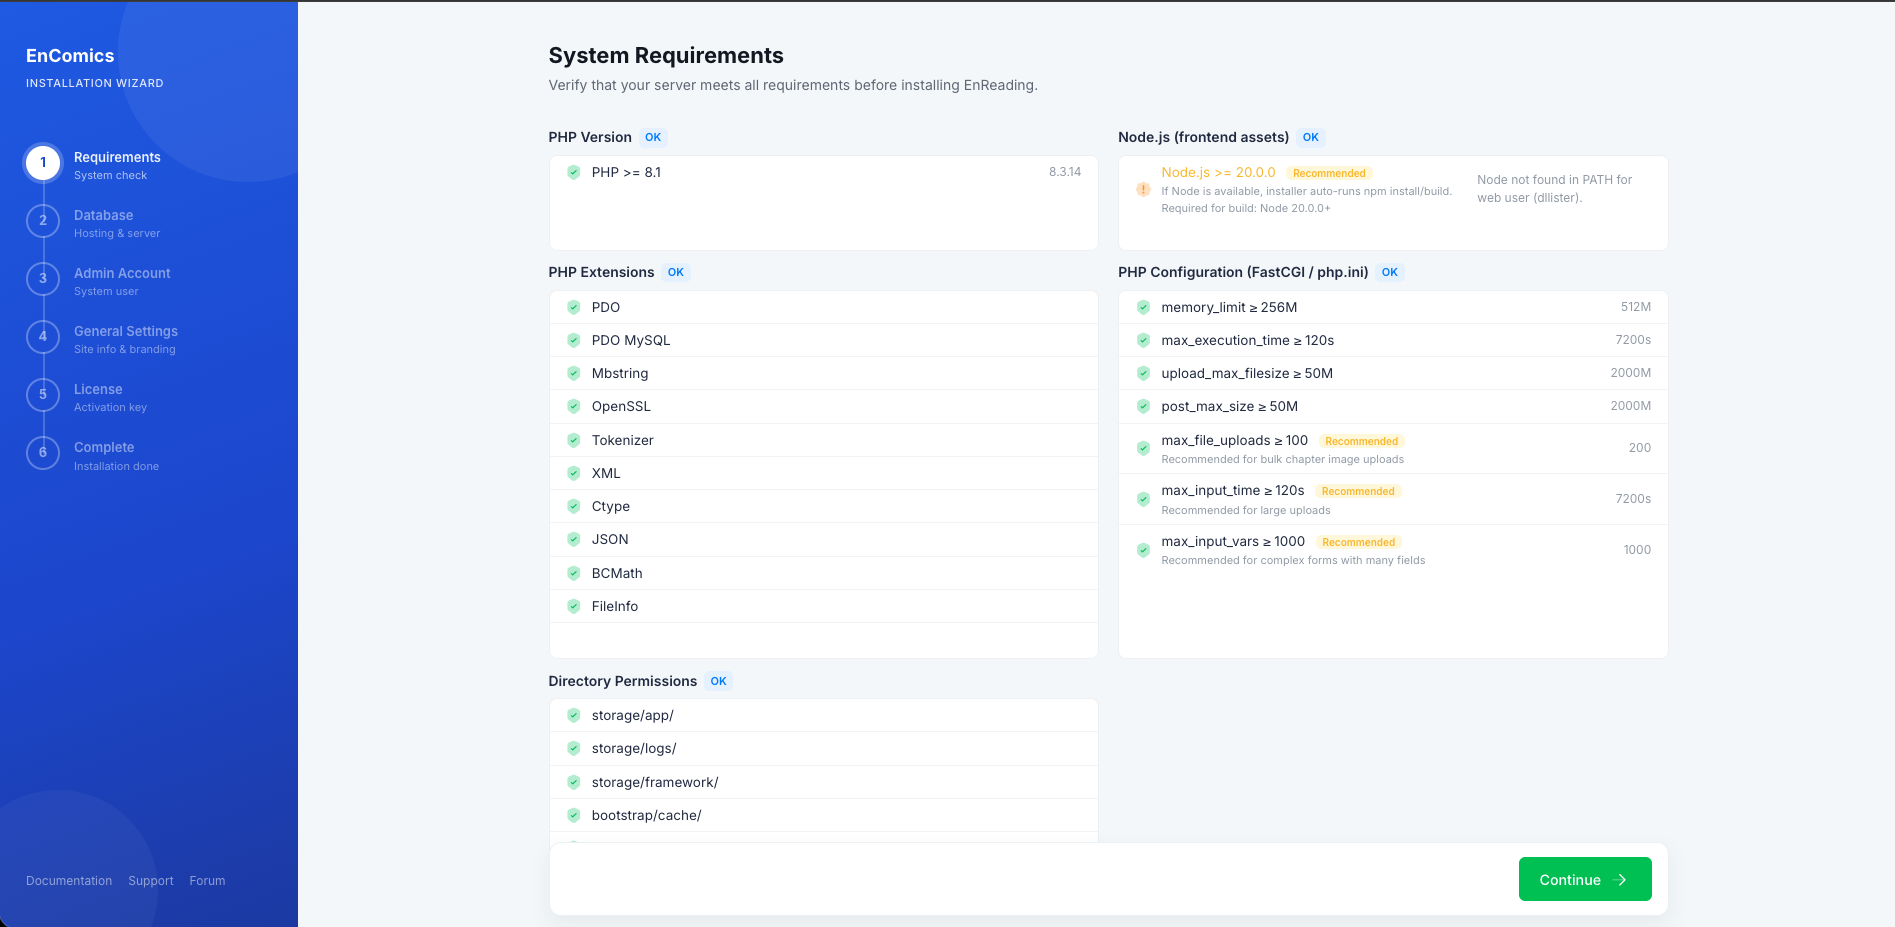 Step-by-step web installation wizard.
- Upload all project files to the server (FTP, Git, hosting panel, etc.).
- Create a MySQL/MariaDB database in your hosting panel and note the credentials.
- Open https://your-domain.com/install in your browser.
- Follow the wizard: enter database details, mail settings, and admin account.
- When finished, the installer is removed automatically for security.
- Log in with the administrator account you just created.
B) Manual installation (own server / CLI)
Alternative for environments with terminal access (VPS, Docker, local development).
- Install PHP dependencies:
composer install - Create environment file:
cp .env.example .env - Set credentials in
.env(DB, mail, app URL). - Generate app key:
php artisan key:generate - Run migrations:
php artisan migrate --force - Install frontend packages:
npm install - Build assets:
npm run build(ornpm run devfor development). - Optional for public storage:
php artisan storage:link
You can also run composer run setup from project root to execute all the above steps automatically.
3) Release notes 1.1.0
- Core stack: Laravel 12, PHP 8.2+, Vite, and Bootstrap-based UI.
- Fully functional Administrator and Creator panels.
- Step-by-step web installer with migrations and admin account setup.
- Monetization system: coins, sales, withdraws, and ads.
- Chunked visual Content Demo importer in Settings.
- ZIP-based update system available from Admin panel.
- Multi-language management: create/edit/export/import/translate.
- Improved shared-hosting compatibility for storage:link.
- New in 1.1.0: Anime Videos module (episodes, genres, catalog slider, watch page, creator publishing).
- New in 1.1.0: Blog Articles module (categories, tags, reactions, comments, creator publishing).
- New in 1.1.0: Anime and Blog content now integrate with the header search, homepage shelves, and Community feed.
- New in 1.1.0: Hardened module licensing so a module can no longer be forced into a free/active state by editing its package manifest or by cloning a development database into production.
4) Navigation map
Admin main menu (real layout)
| Section | Main submenus |
|---|---|
| Dashboard | Dashboard |
| Comics | Add Comic, Comic List, Genres |
| Novels | Add Novel, Novels List, Genres |
| Moderation & Scans | Cs & Ns Reports, Comments, Scans, Cs & Ns Languages |
| Support | Tickets, Alerts |
| People | Users, Subscribers, Scans, Roles & Permissions |
| Payments & Monetization | Withdraws, Coins, Sales, Ads |
| Reports | Reports |
| External Storage (if module enabled) | Servers, Settings |
| Settings | General, Email & Templates, Payment Methods, Monetization, Scan Panel, Social Login, Languages, Currency, Modules, Front Pages, Google API, Updates, License |
Creator Panel (top menu)
Home Comics Novels Reports Followers Avatar > Account Settings
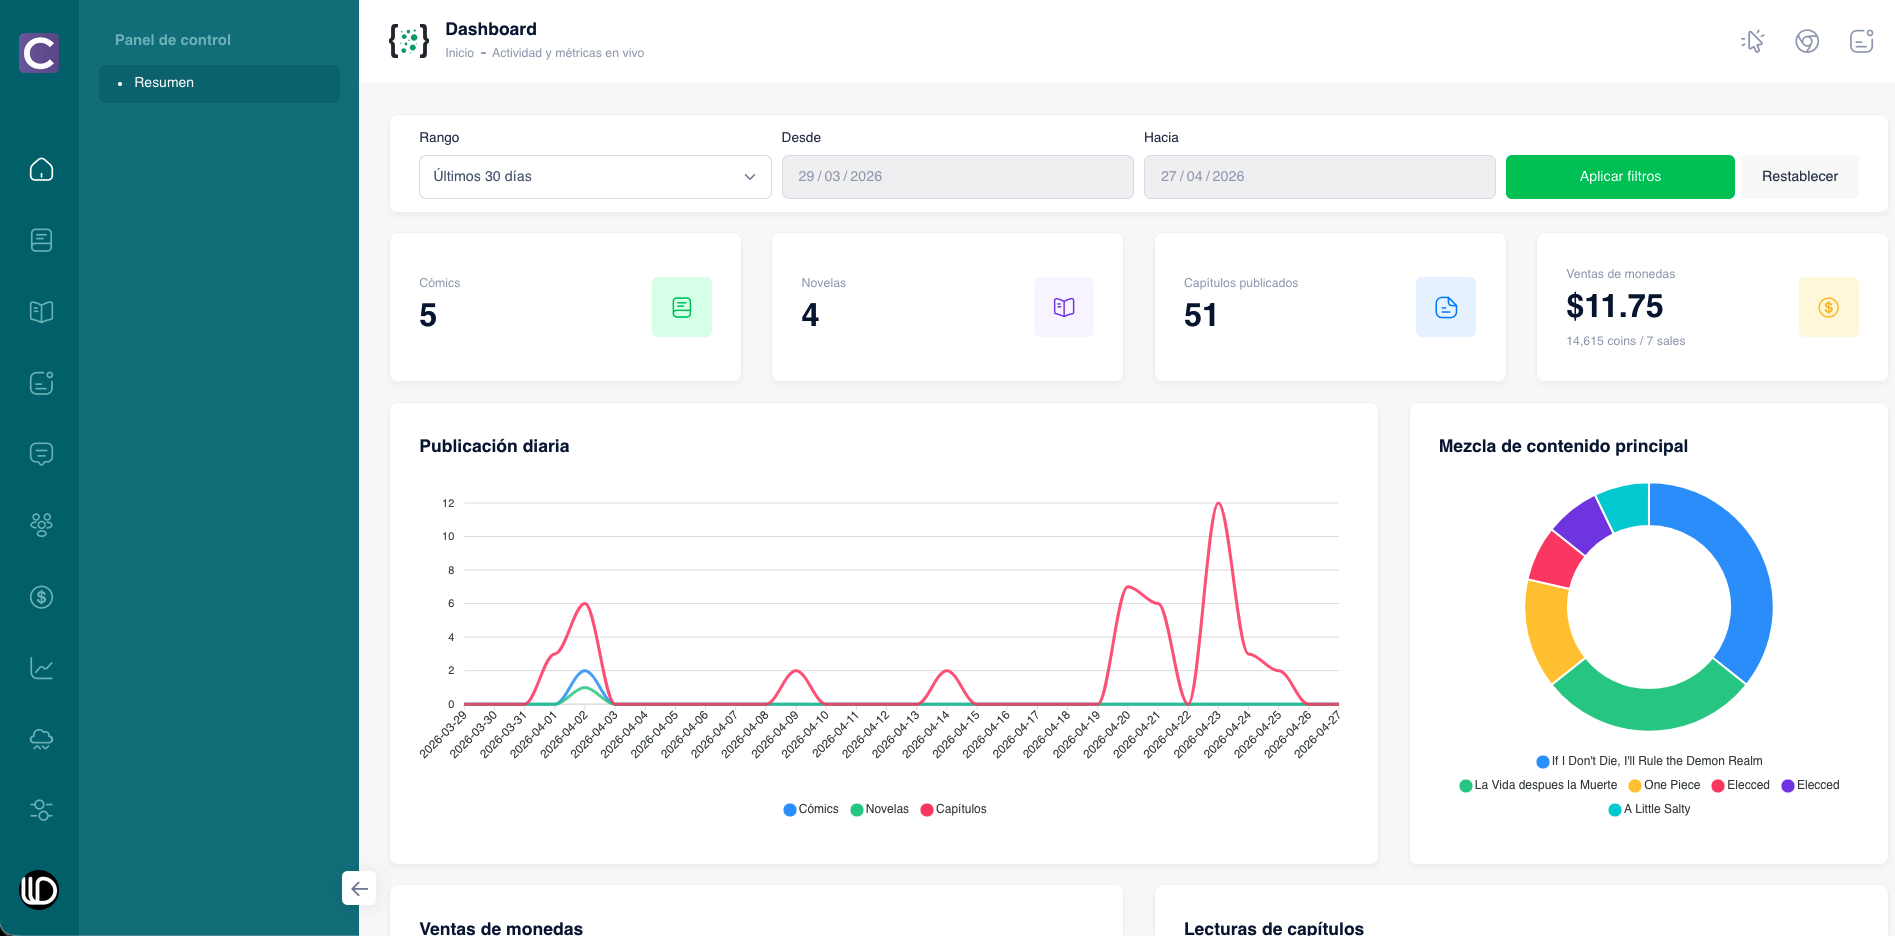
2) Admin > Dashboard
- Open admin panel home.
- Review global metrics (content volume, activity, trend signals).
- Use dashboard as daily checkpoint before moderation and payout tasks.
3) Admin > Comics
A) Create a new comic
Admin > Comics > Add Comic
- Fill cover, web status, content status, demography, comic type.
- Set authors, slider visibility, recommendation, and scan collaboration options.
- Complete title, alt titles, description, publication dates, reading direction.
- Select languages and genres.
- Save with Create comic.
B) Publish comic chapters
Admin > Comics > Comic List > Actions > Add chapters
- Complete chapter basics: title, number, short description, cover, release date, publish date.
- If this is an existing chapter number, enable Publish in existing chapter.
- Per language, choose Free or Premium and expiration date for premium.
- Upload content per language using Images or ZIP/CBZ.
- If using images, reorder and remove pages as needed.
- Save with Create chapter.
C) Daily operations in Comic List
- Filter by type, demography, content status, web status, language.
- Use bulk delete for controlled cleanup.
- Per-row Actions: Edit, View, Copy, Add chapters, Delete.
4) Admin > Novels
A) Create a new novel
Admin > Novels > Add Novel
- Fill cover, web status, content status, novel type, demography, authors.
- Set slider/recommended/scan publication options as needed.
- Complete title, description, dates, languages, genres.
- Save with Create novel.
B) Publish novel chapters
Admin > Novels > Novels List > Actions > Add chapters
- Define chapter basics (cover, title, number, short description, dates).
- Per language, set Free/Premium and premium_expires_at.
- Novel chapter body is rich text per language (TinyMCE or CKEditor).
- Save and verify in public reader.
5) Admin > Moderation & Scans
A) Cs & Ns Reports
Admin > Moderation & Scans > Cs & Ns Reports
- Filter by type and status.
- Review report context (title, language, chapter, scan).
- Update status (pending/corrected).
- Delete obsolete reports individually or in bulk.
B) Comments moderation
Admin > Moderation & Scans > Comments
- Actions: mark spam, mark visible, trash, restore, destroy.
- Use bulk moderation during abuse spikes.
C) Cs & Ns Languages
Admin > Moderation & Scans > Cs & Ns Languages
- Create, update, remove content languages.
- Use import/export for environment migration.
6) Admin > Support
A) Tickets
Admin > Support > Tickets
- Filter by open/in_progress/closed.
- Open ticket thread and review priority/history.
- Reply to scan from the ticket page.
- Update status on every response for clean SLA tracking.
B) Alerts
Admin > Support > Alerts
- Create global support alerts.
- Toggle on/off without deleting.
- Delete single or bulk when no longer needed.
7) Admin > People
Admin > People > Users / Subscribers / Scans / Roles & Permissions
- Manage accounts (create, update, password reset, 2FA, remove).
- Use Subscribers and Scans for audience/team operations.
- Keep Roles & Permissions aligned with least privilege.
8) Admin > Payments & Monetization
A) Withdraws
Admin > Payments & Monetization > Withdraws
- Filter by pending/approved/declined.
- Open detail modal and verify payout data.
- Set payout amount, add notes, approve or decline.
- Delete old records when retention policy allows it.
B) Coins
Admin > Payments & Monetization > Coins
- Track stock and purchase metrics.
- Use Add coin stock to increase reserve.
- Create packages (icon, name, coins, offer_coins, price, status).
- Edit/toggle/remove packages based on conversion performance.
C) Sales
Admin > Payments & Monetization > Sales
- Audit by reference, user, package, provider and status.
- Filter by status and keyword search.
- Bulk cleanup only with clear archival policy.
D) Ads
Admin > Payments & Monetization > Ads
- Create ad with name, type (display/rewarded), priority, placement, audience.
- For rewarded ads set reward_coins, daily cap and required watch seconds.
- Select content type: image or HTML/code.
- Enable/disable based on performance and safety checks.
9) Admin > Reports
Admin > Reports > Reports
- Generate reports by period, type, status, search text.
- Download archived reports for audit/compliance.
- Delete stale reports to keep list manageable.
10) Admin > External Storage (if module enabled)
Admin > External Storage > Servers / Settings
- Register external servers and test connectivity.
- Set default server when you need fixed routing.
- Toggle server availability without deleting record history.
- Adjust module settings and capacity strategy.
Note: This module is not included in the purchase; you must purchase it separately.
11) Admin > Settings
This area controls the full platform baseline: general setup, email, payment methods, monetization, scan panel, social login, languages, currency, modules, front pages, Google API, updates, and license.
Recommended first-time setup order
- General: system identity, base URL, timezone.
- Email & Templates: SMTP/API + test email.
- Payment Methods + Monetization: providers and business rules.
- Languages + Currency: define active/default options.
- Modules: enable required extensions.
- License/Updates: keep deployment validated.
12) Admin > Settings > Content Demo
Demo data is no longer imported during the installer wizard to prevent timeouts on shared hosting. It is now imported from Admin Panel > Settings > Content Demo in safe chunks.
- Open Settings > Content Demo.
- Click Import demo (or Continue import if an import session already exists).
- Wait until the progress reaches 100% and status shows Completed.
- Refresh homepage to verify sample comics/novels were added.
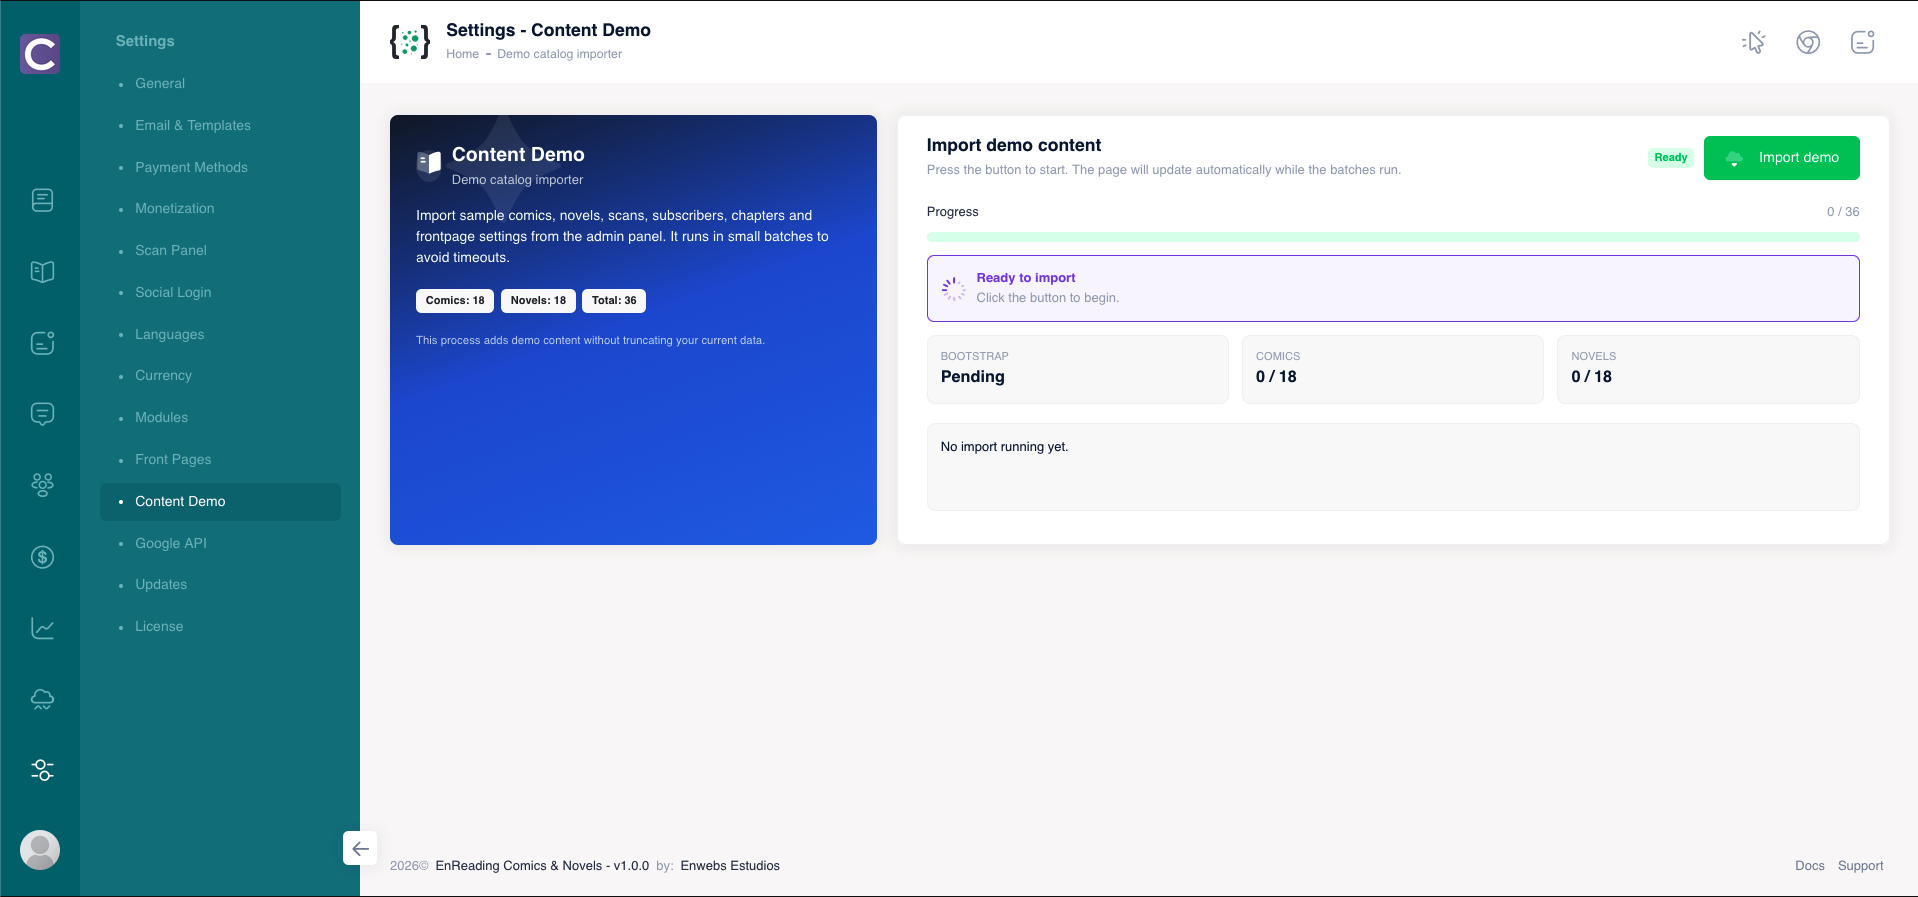 Chunked visual importer for demo content.
13) Recover storage:link if installation fails
In some environments (cPanel, Hostinger, HestiaCP, VestaCP, or shared hosting), symbolic-link creation may fail during installation because of permissions or webroot paths.
A) Recommended option: Admin button
Admin > Settings > General > Retry Storage Link
- Go to Settings > General.
- Find the Public Storage Link block.
- Click Retry Storage Link.
- Review the result and the on-screen Attempt log.
B) CLI option (SSH)
- Navigate to your project root.
- Run
php artisan storage:link --force. - If your webroot is
public_html, create link manually:ln -s /path/to/storage/app/public /path/to/public_html/storage - Verify files are served from
/storage/....
14) Creator Panel (top menu)
A) Home
Creator > Home
- Published content summary, chapter count, followers, earnings.
- Reads trend chart, top followed chart, top reads, recent earnings.
B) Comics
Creator > Comics
- Create comic with full metadata fields.
- Publish chapter per language with images/zip and premium logic.
- Use existing chapter flow where parent chapter already exists.
C) Novels
Creator > Novels
- Create novel with full metadata fields.
- Publish chapter per language using rich text editor.
- Set premium per language for monetized releases.
D) Reports
Creator > Reports
- Filter reports by type/status.
- Open detail and jump to chapter edit quickly.
- Mark corrected after fix deployment.
E) Followers
Creator > Followers
- Track audience growth and engagement signals.
15) Creator > Account Settings
Creator > Avatar menu > Account Settings
| Tab | Operational use |
|---|---|
| Information | Profile, avatar, public banner, password, 2FA. |
| Payment Methods | Stored payment methods according to enabled gateways. |
| Withdraws | Payout requests and status tracking. |
| Withdraws Payment | Payout destination accounts (bank/paypal/patreon/crypto). |
| Earnings | Cash and coin earnings history. |
| Reading History | Personal read history. |
| Followed Content | Followed content watchlist. |
| Tickets | Support requests and admin responses. |
| Messages | Internal conversations. |
| Settings | Account preferences. |
| Delete Account | Permanent account closure. |
16) Modules Overview
Admin > Settings > Modules
Modules are installed from ZIP packages, then activated with license (non-local environments), and finally enabled per business need. Keep only required modules active for better operational focus.
16.1) Anime Videos
- Full anime catalog: series/movies/OVA, genres, multi-language episodes with local, external-link or iframe video sources.
- Catalog homepage with hero slider (4 selectable styles), genre sections, and a "Latest Episodes" row — matching the Comics/Novels homepage layout.
- Reader-style watch page: server/language picker with flags, reactions, comments, follow/favorite, and a "seen" progress tracker.
- Creator publishing: creators get a "My Anime" panel to publish and manage their own series and episodes (gated by an Admin setting).
- Integrates with the header search, the Community feed, and creator/admin community profiles ("Public Animes" tab), and adds Animes/Episodes totals to the Admin dashboard.
- All integrations are gated behind the module being installed, enabled and licensed — Comics/Novels behave exactly the same with the module absent or disabled.
16.2) Blog Articles
- Full article system: multiple categories and tags per post, cover image (upload or pick from the Multimedia Library), reactions, likes, and comments.
- Catalog homepage with hero slider (4 selectable styles) and a category-pill filtered grid; article page with related articles (matched by category or tag) and a share row.
- Configurable editor: automatically follows the TinyMCE/CKEditor choice (and CKEditor classic/document mode) already configured in Admin > Settings > General.
- Creator publishing: creators get a "Blog" panel to write and manage their own articles (gated by an Admin setting), with the author's avatar/role shown and linked from the article page.
- Integrates with the header search, the front sidebar (categories and tags, with filtering), the Community feed, and creator/admin community profiles ("Public Articles" tab), and adds Posts/Published Articles totals to the Admin dashboard.
16.3) Telegram Auto Publish
- Publishes comics, novels, and chapters to Telegram channels through Bot API.
- Requires bot token, chat ID, and bot admin permission in target channel.
- Supports test message and immediate dispatch from module screen.
16.4) Discord Auto Publish
- Publishes comics, novels, and chapters to Discord through webhook.
- Supports test message, filters by content type, and dispatch logs.
- Useful for community-first release notifications.
16.5) External Server Storage
- Stores chapter assets on external FTP/SFTP/S3-compatible servers.
- Includes connection tests, default server, and failover toggles.
- Use when scaling media workloads beyond local disk.
16.6) Subscriptions Premium
- Adds recurring subscription plans and premium access controls.
- Enables subscriber management and module settings from Admin.
- Use with monetization and payment method configuration.
16.7) EnReading Scraper Content
- Multi-source, multi-language content scraper (English, Spanish, Portuguese, French sources configurable per language) with local or external storage per source.
- Match & Sync tool: search a source, preview matched chapters against your existing catalog, and sync only what you approve.
- Background jobs with pause/resume/cancel, per-source dispatch, run status, and dispatch logs from the module screen.
- This module does not require a purchase code — it is free to use once installed.
16.8) Themes (Neon Impact)
- Themes are installed the same way as modules (ZIP upload from Admin > Settings > Modules) but are managed under Admin > Settings > Themes.
- Neon Impact: a homepage theme inspired by an arcade/anime layout, with a hero impact section, top-ranking blocks, and horizontal shelves. Free to use once installed.
17) Changelog
Keep release tracking separated from operational manuals. For current project history, use the changelog file shipped in root: CHANGELOG-1.1.0.txt.
- Current release: 1.1.0.
- 1.1.0 adds the Anime Videos and Blog Articles modules, plus module-licensing hardening (see Release notes above).
- Track module updates (Anime/Blog/Telegram/Discord/Storage/Subscriptions/Scraper) in dedicated changelog entries per release.
- Update both English and Spanish docs when publishing a new version.
18) Screenshots (final user version)
Real screenshots included from docs/shots/. Click any image to open it in large preview.
 admin-dashboard.pngMain admin dashboard overview.
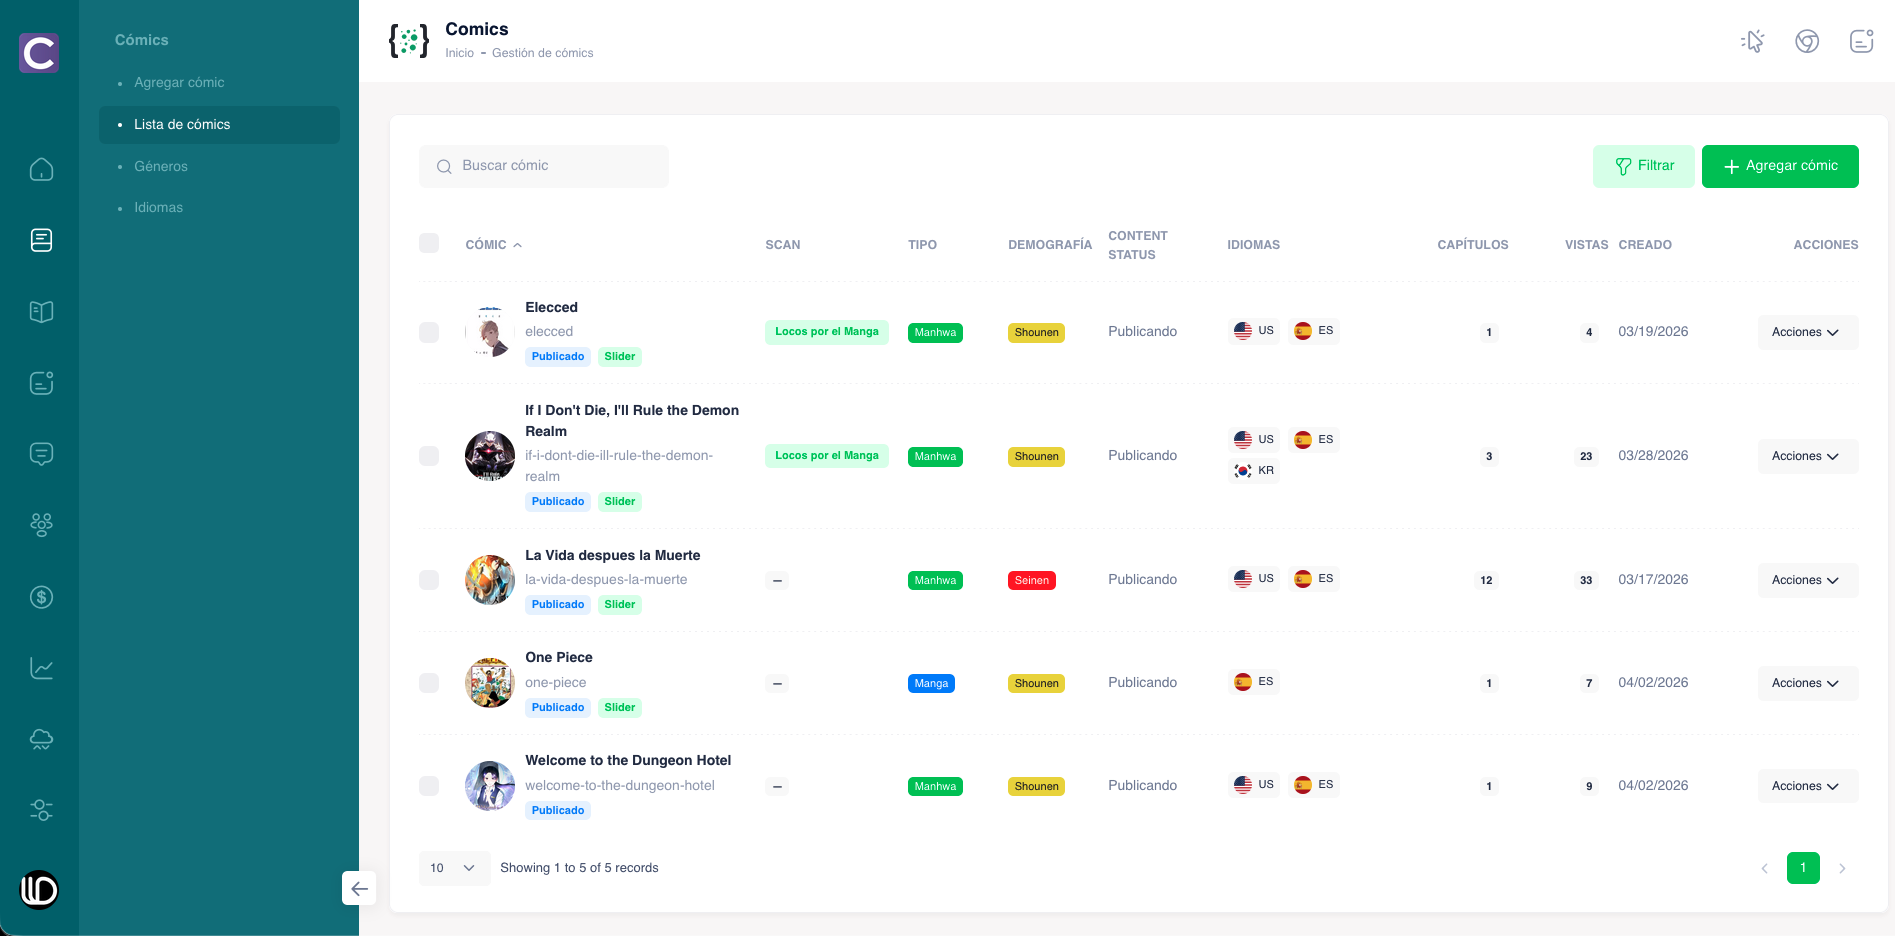 admin-comics-list.pngComics list with filters and actions.
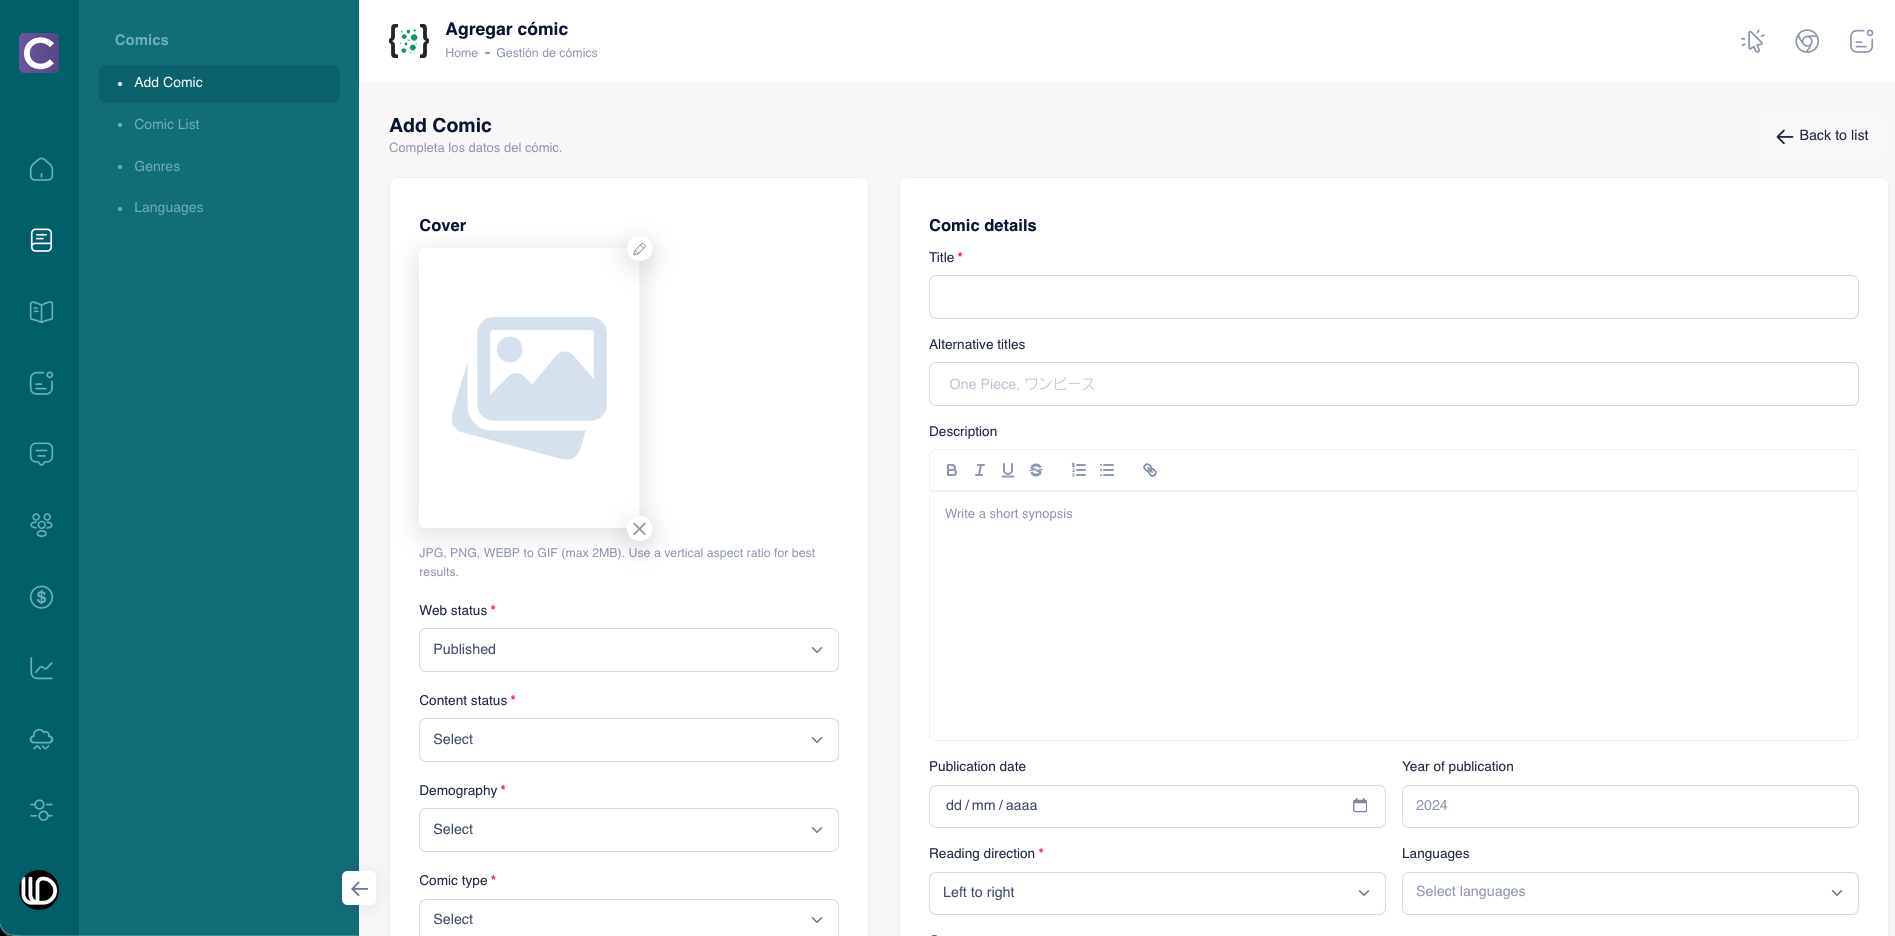 admin-comic-create.pngComic creation form.
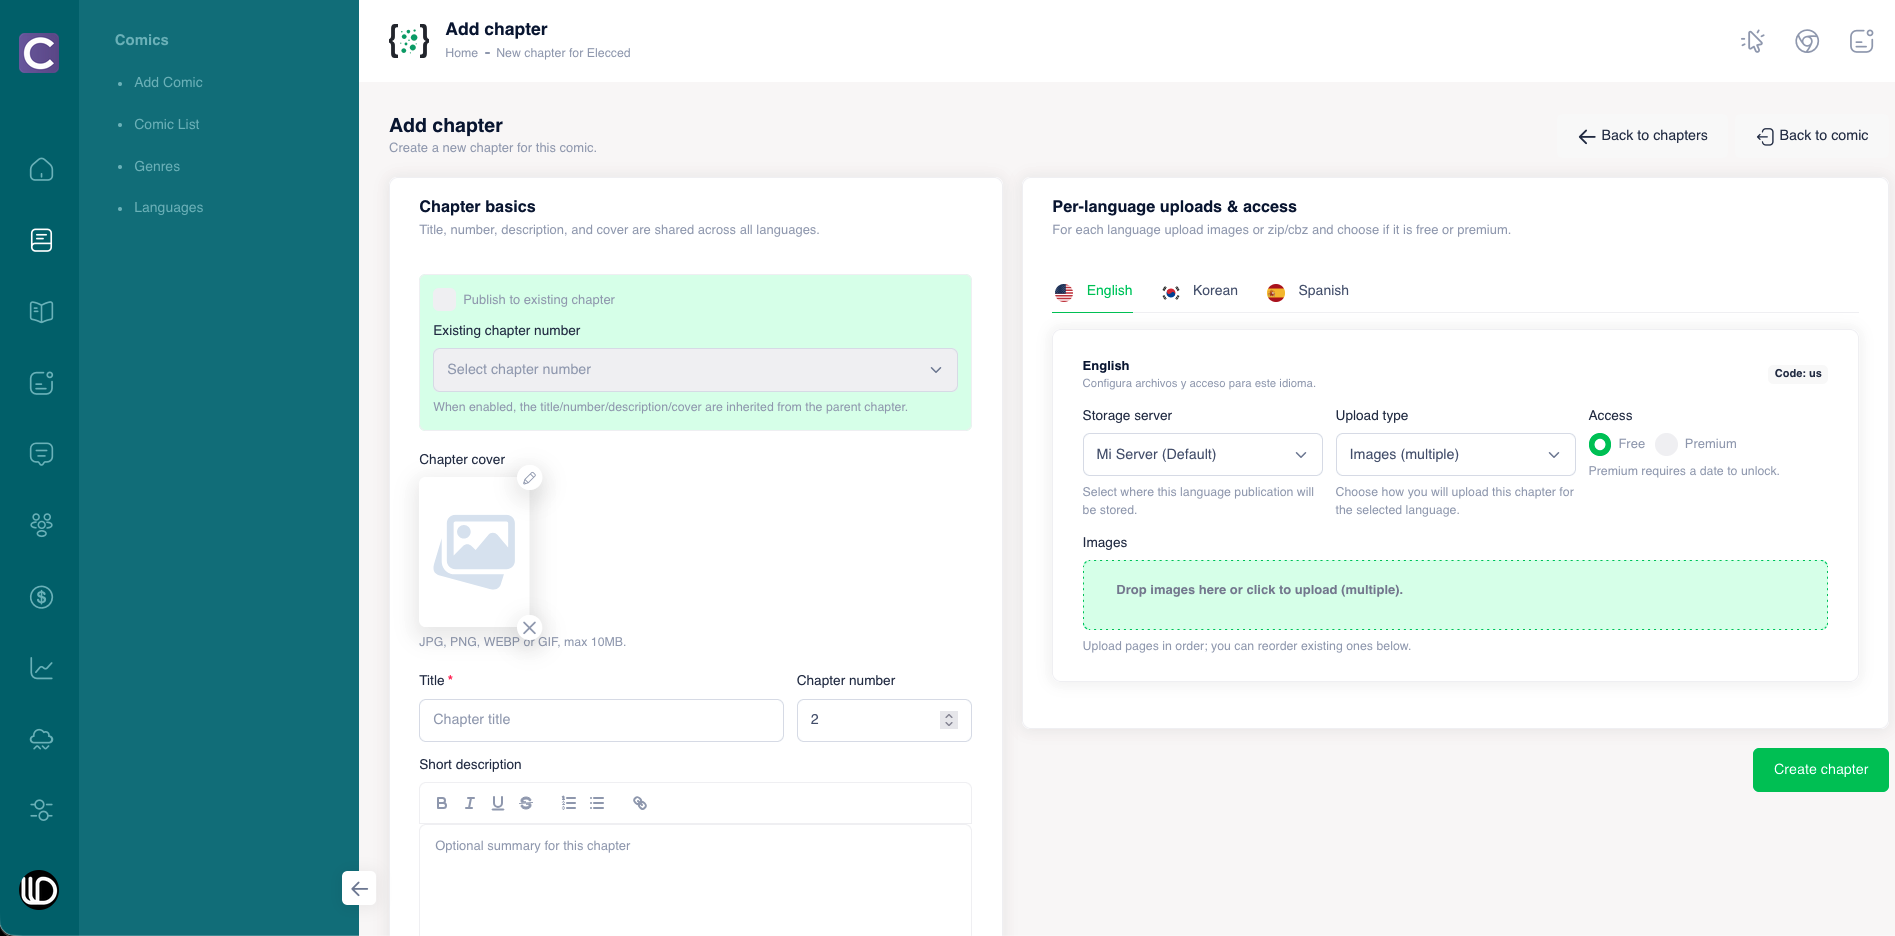 admin-comic-chapter-create.pngMulti-language comic chapter publishing flow.
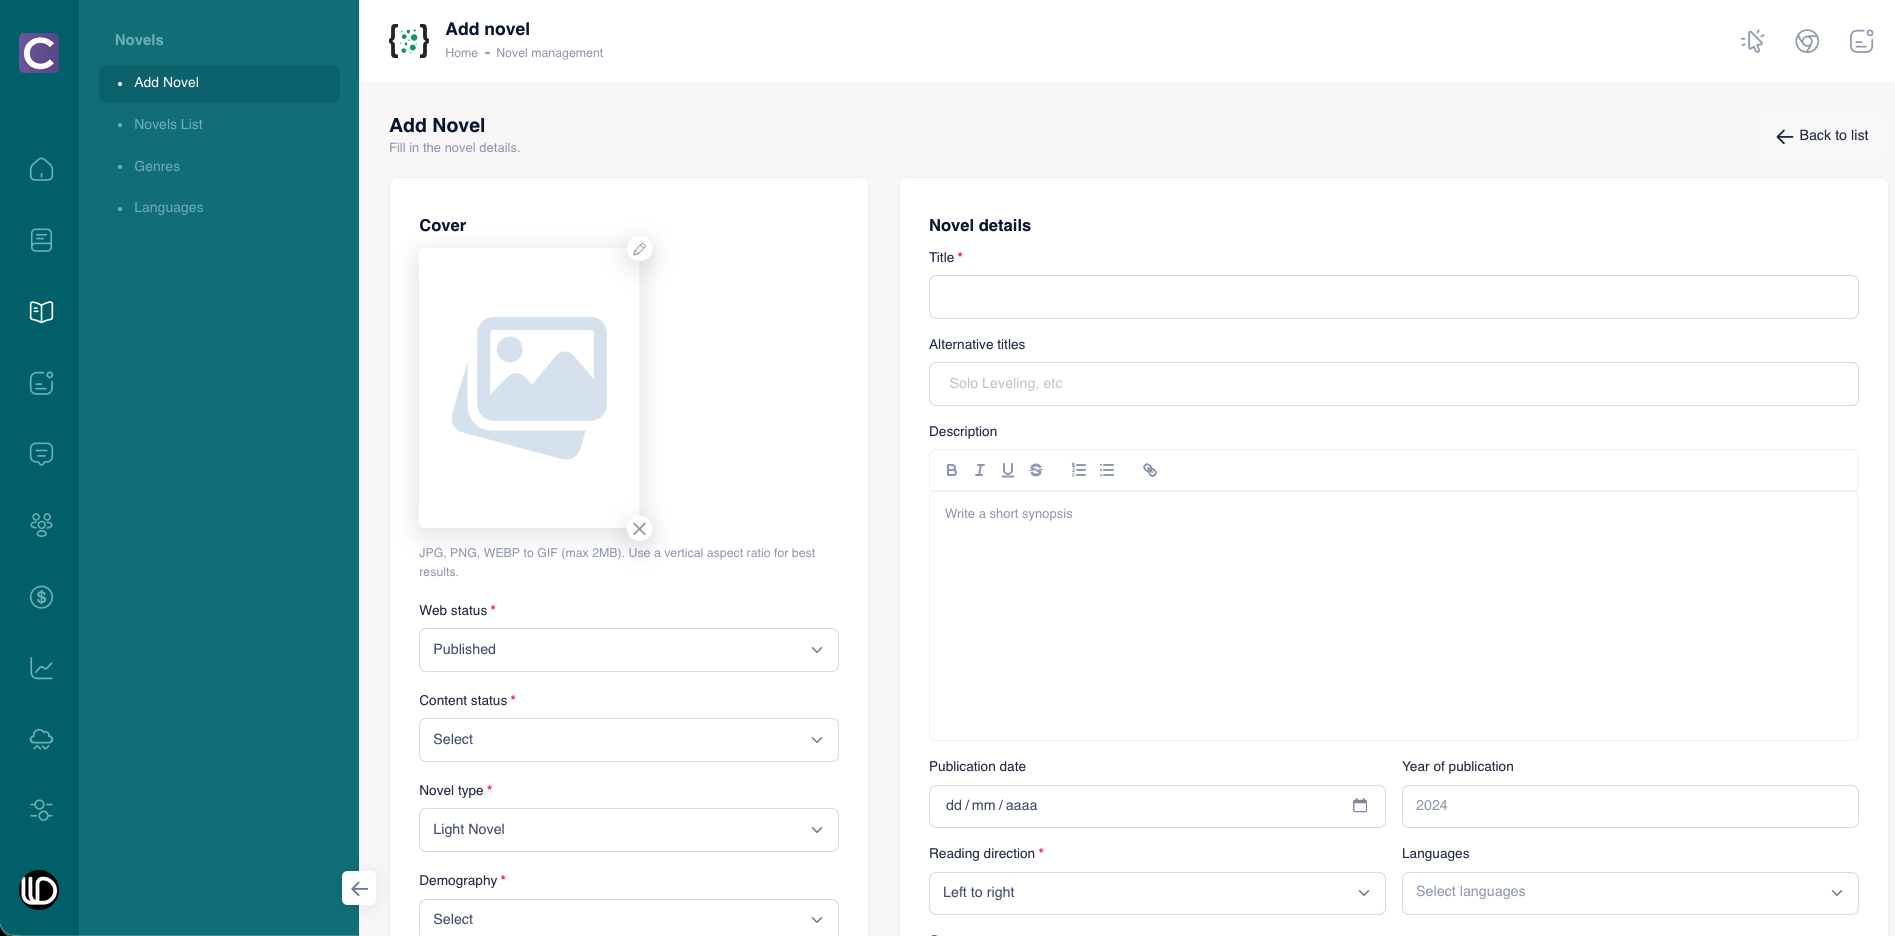 admin-novel-create.pngNovel creation form.
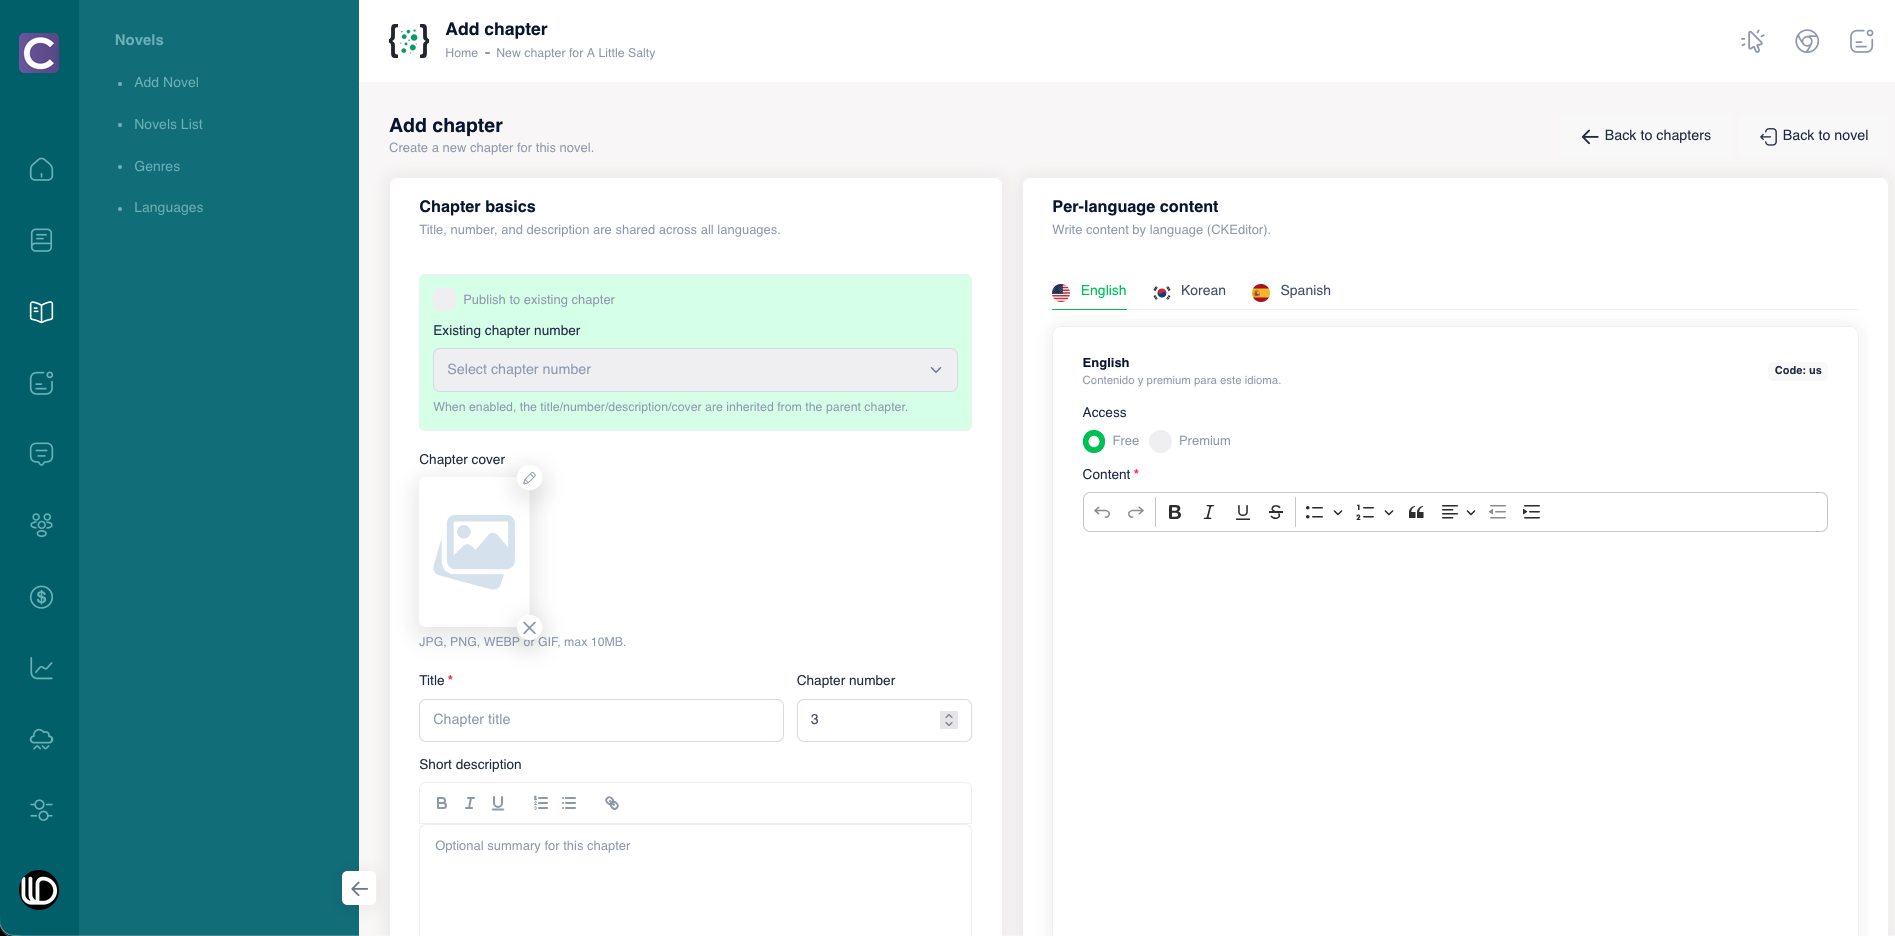 admin-novel-chapter-create.pngPer-language novel chapter editor.
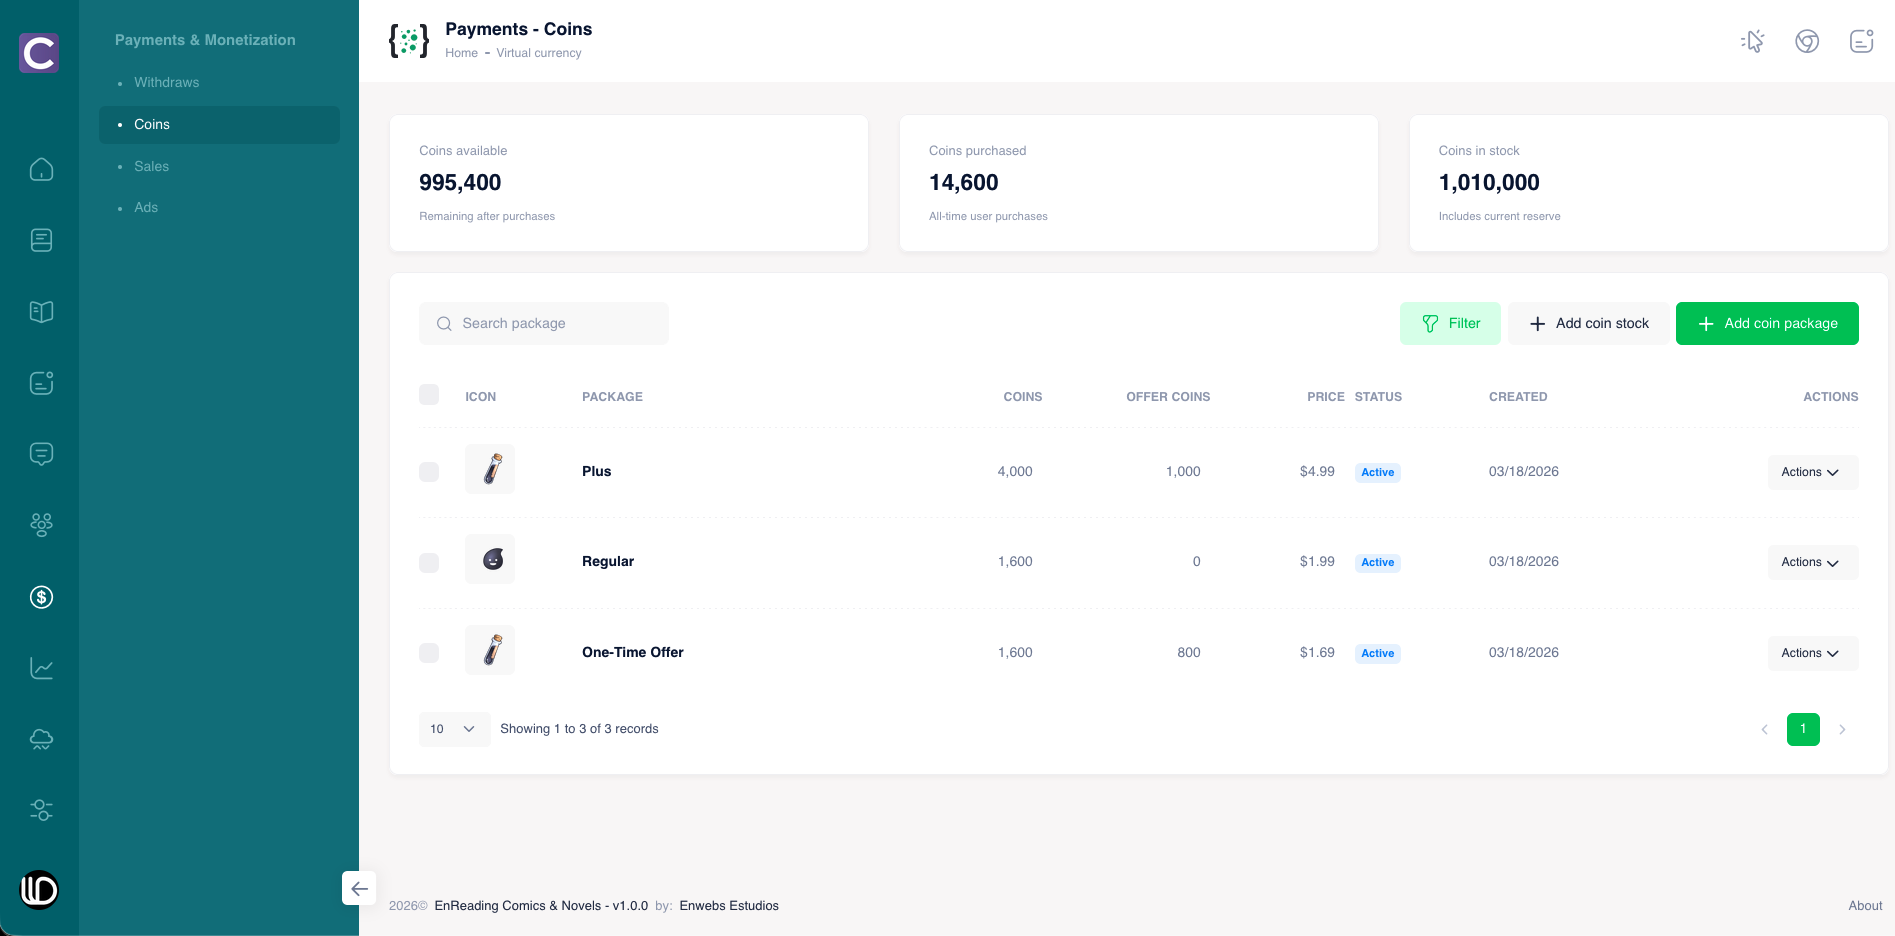 admin-payments-coins.pngCoins stock and package management.
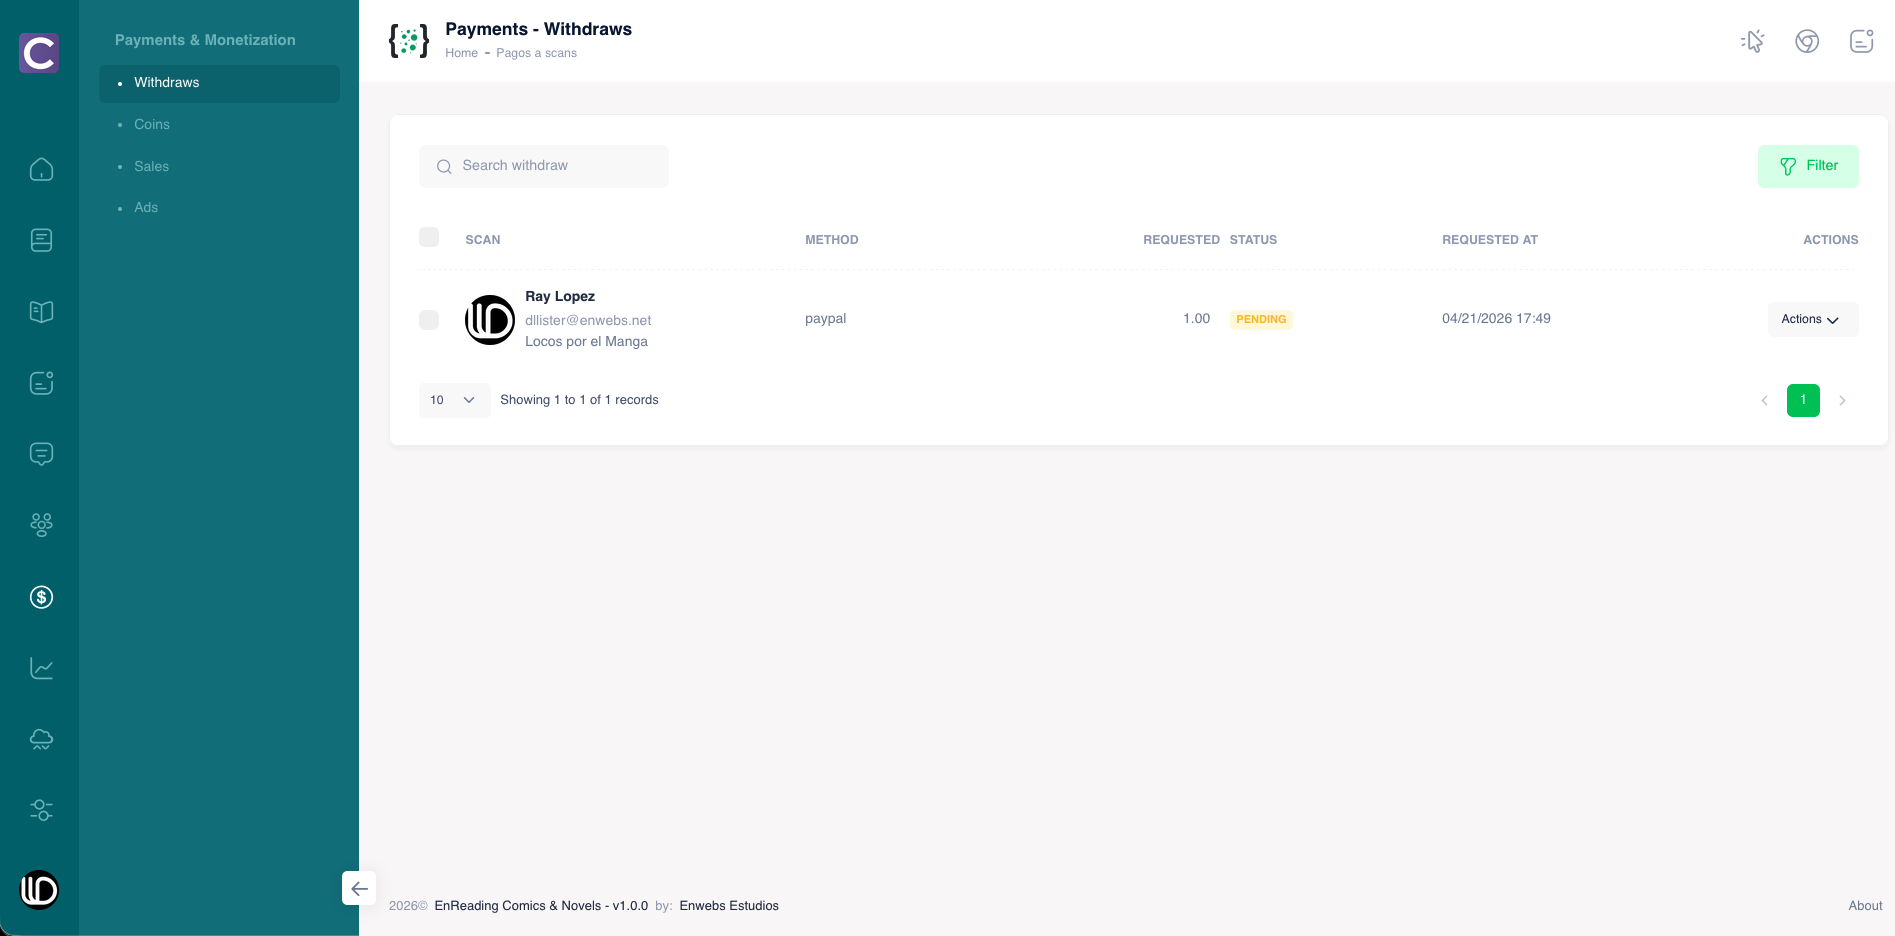 admin-payments-withdraws.pngWithdraw review and approval flow.
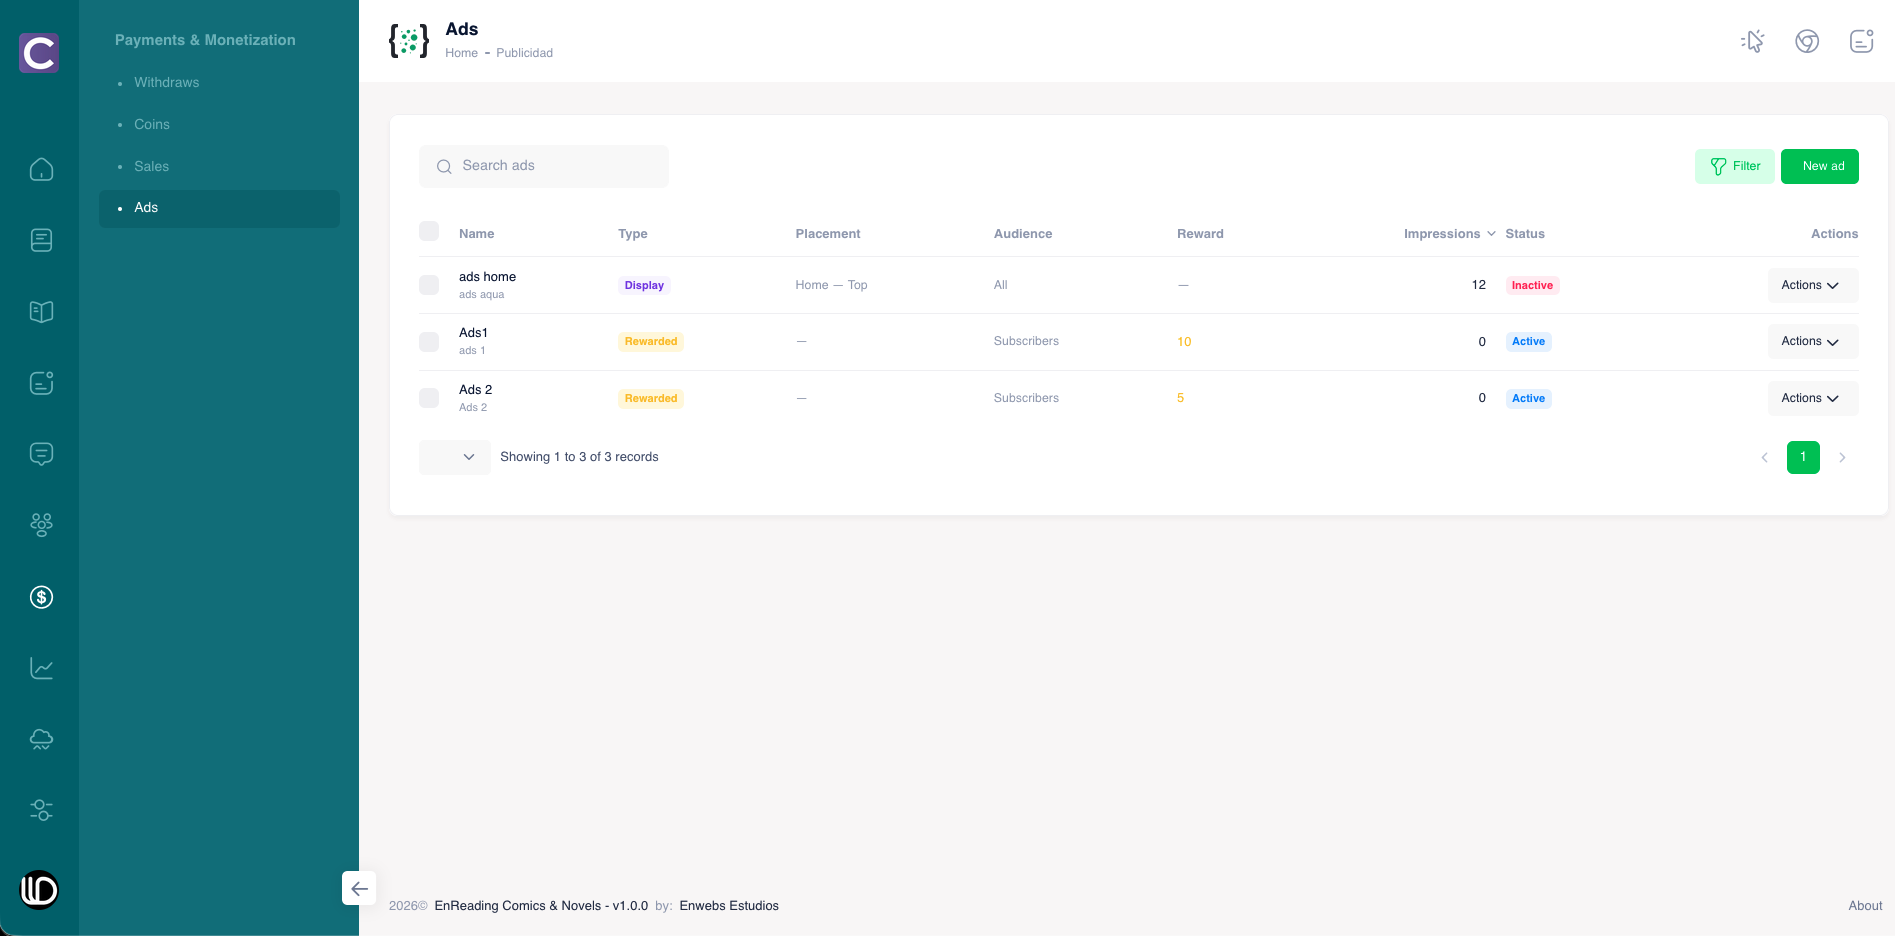 admin-ads.pngAds setup and management.admin-content-demo.pngChunked demo content importer in Settings.
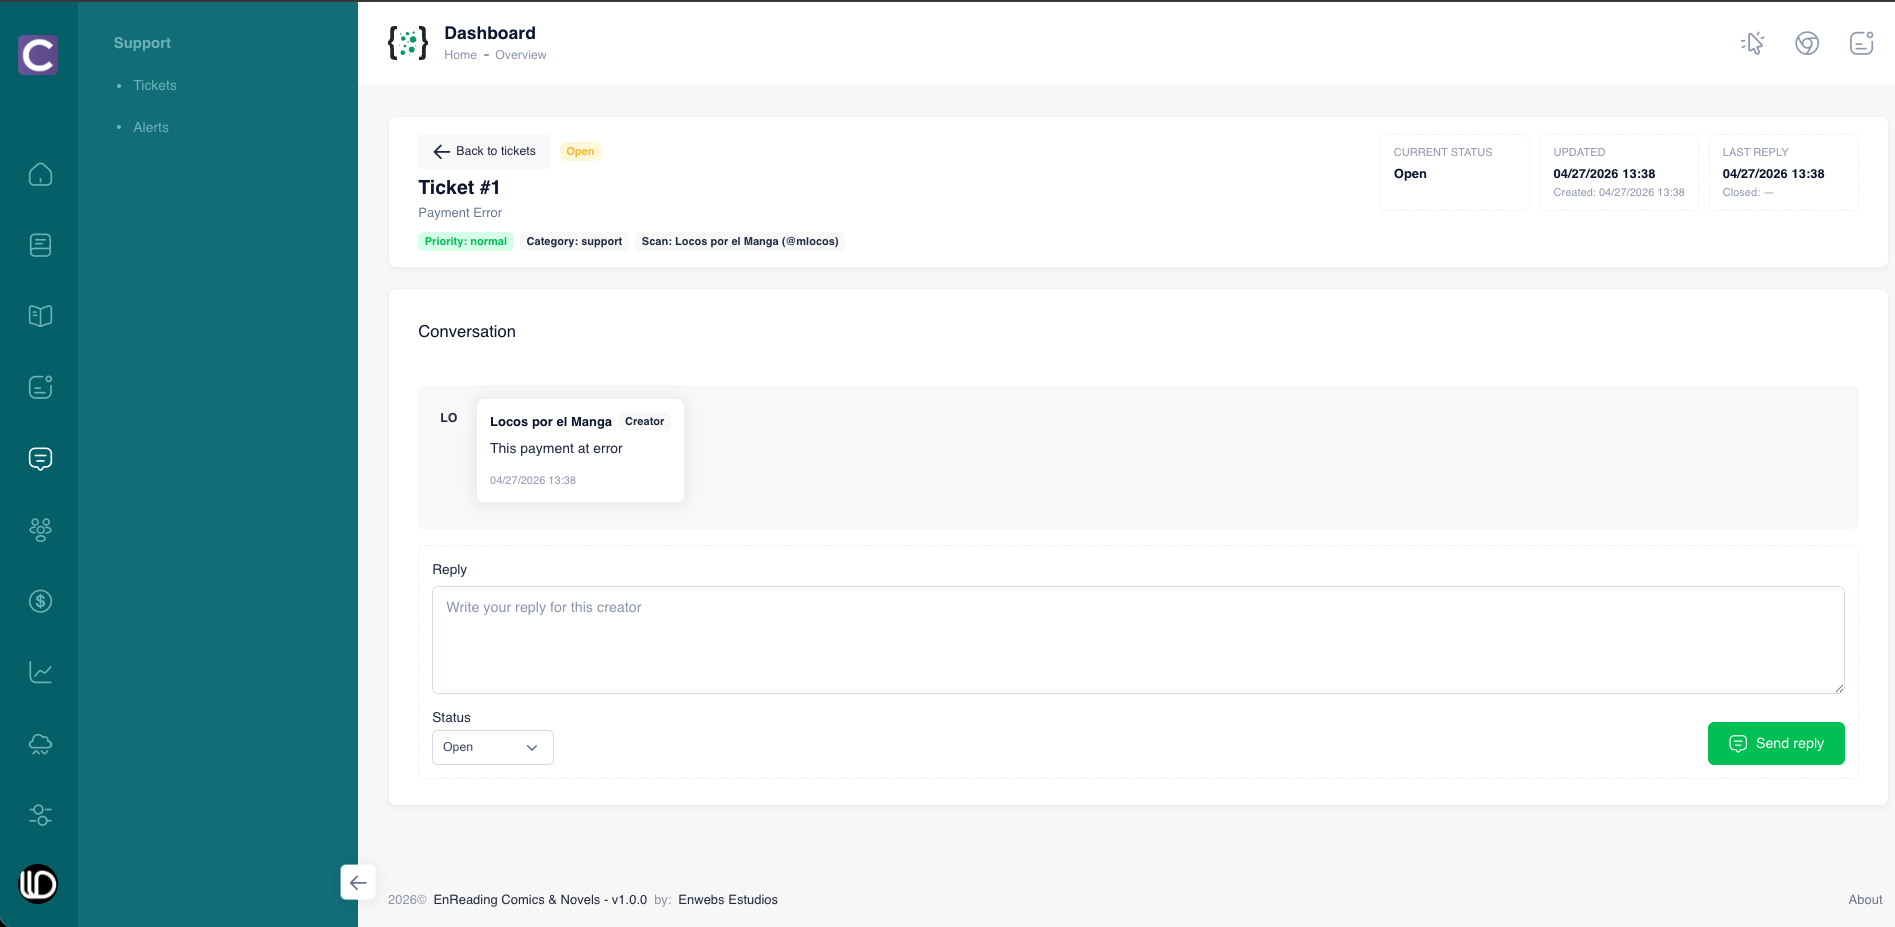 admin-tickets-show.pngTicket detail and reply view.
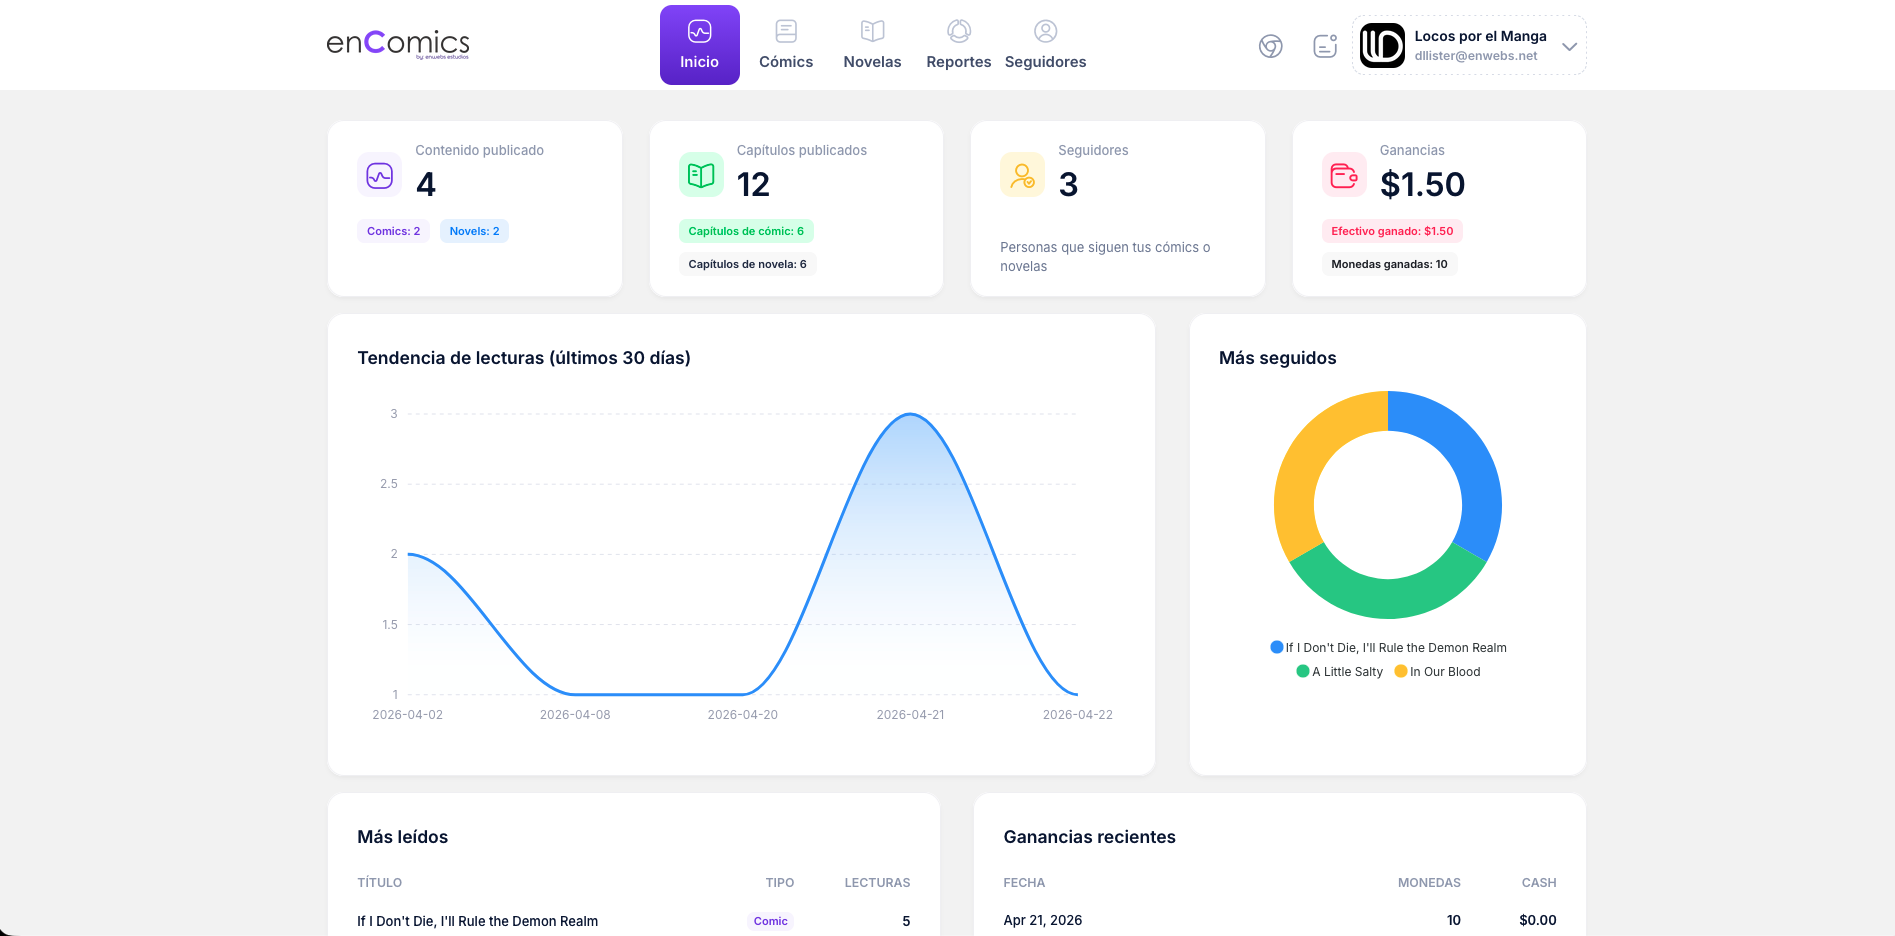 creator-dashboard.pngCreator panel home dashboard.
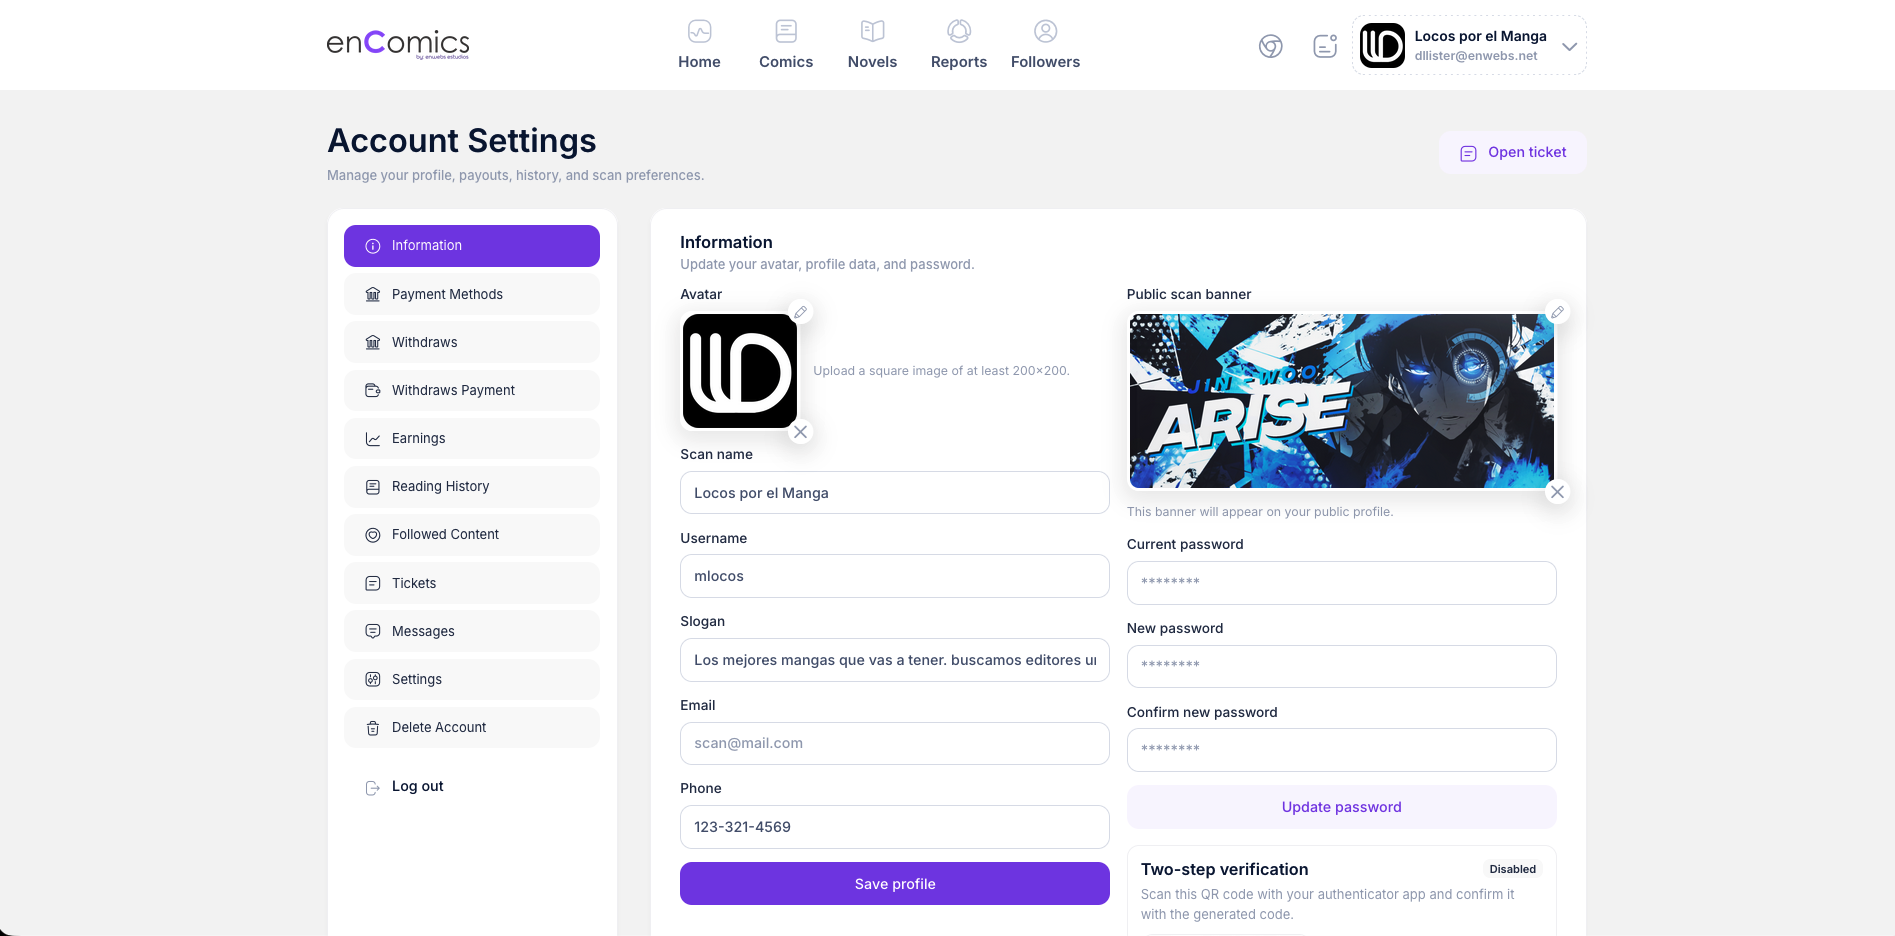 creator-account-settings.pngCreator account settings tabs.